Release 2 (9.2)
Part Number A96573-01
Home |
Book List |
Contents |
Index |
 Master Index |
 Feedback |
| Oracle Advanced Security Administrator's Guide Release 2 (9.2) Part Number A96573-01 |
|
This chapter describes how to configure Oracle Advanced Security for Oracle9i for use with Kerberos authentication--and how to configure Kerberos to authenticate Oracle database users. This chapter contains the following topics:
To enable Kerberos authentication:
Install Kerberos on the system that functions as the authentication server.
| See Also:
Notes about building and installing Kerberos from Kerberos version 5 source distribution for information about how to install Kerberos. |
To enable the Oracle database server to validate the identity of clients that authenticate themselves using Kerberos, you must create a service principal for Oracle9i.
The name of the principal should have the following format:
kservice/kinstance@REALM
Each of the fields in the service principal specify the following values:
|
Note: The utility names in this section are executable programs. However, the Kerberos user name |
For example, if kservice is oracle, the fully qualified name of the system on which Oracle9i is running is dbserver.someco.com and the realm is SOMECO.COM. The principal name is:
oracle/dbserver.someco.com@SOMECO.COM
It is a convention to use the DNS domain name as the name of the realm. To create the service principal, run kadmin.local. On UNIX, run this command as the root user, by using the following syntax:
# cd /kerberos-install-directory/sbin# ./kadmin.local
To add a principal named oracle/dbserver.someco.com@SOMECO.COM to the list of server principals known by Kerberos, enter the following:
kadmin.local:addprinc -randkey oracle/dbserver.someco.com@SOMECO.COM
Extract the service table from Kerberos and copy it to the Oracle database server/Kerberos client system.
For example, use the following steps to extract a service table for dbserver.someco.com:
kadmin.local: ktadd -k /tmp/keytab oracle/dbserver.someco.com
Entry for principal oracle/dbserver.someco.com with kvno 2, encryption DES-CBC-CRC added to the keytab WRFILE: 'WRFILE:/tmp/keytab
kadmin.local: exit
oklist -k -t /tmp/keytab
kadmin.local to append to them.
If you do not enter a realm when using ktadd, it uses the realm of the current host and displays it in the command output, as shown in Step 1.
The following example shows how to move the service table on a UNIX platform:
# mv /tmp/keytab /etc/v5srvtab
The default name of the service file is /etc/v5srvtab.
Install the Oracle database server and client software.
Install Oracle Net Services and Oracle Advanced Security on the Oracle database server and Oracle client systems.
Configure Oracle Net Services on the Oracle database server and client.
See Also:
|
Perform these tasks to set required parameters in the Oracle database server and client sqlnet.ora files:
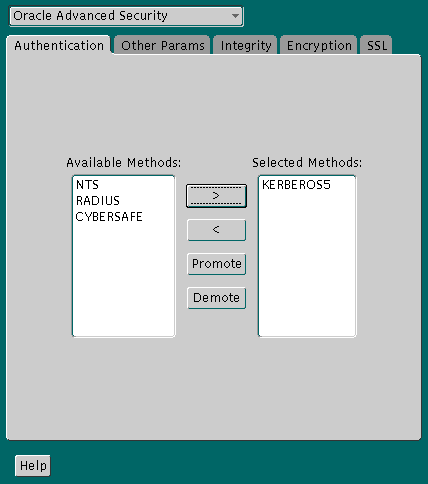
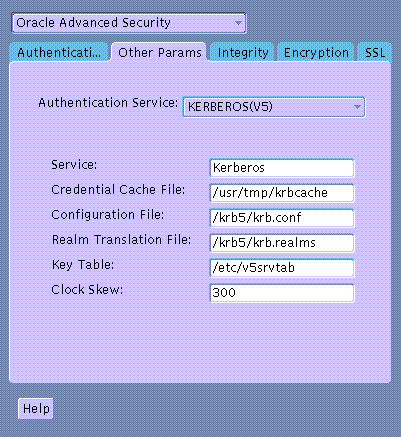
Perform the following steps to configure Kerberos authentication service parameters on the client and on the database server:
> Profile.
Text description of the illustration kerb0001.gif
KERBEROS5.KERBEROS5 to the Selected Methods list by clicking the right arrow (>).KERBEROS5 to be the first service used, move it to the top of the list.
KERBEROS(V5).Kerberos into the Service field. This field defines the name of the service Oracle9i uses to obtain a Kerberos service ticket. When you provide the value for this field, the other fields are enabled.| See Also:
Oracle Net Manager online help, and "Step 3: Set sqlnet.ora Parameters (optional)", for more information about the fields and the parameters they configure |
The sqlnet.ora file is updated with the following entries:
SQLNET.AUTHENTICATION_SERVICES=(KERBEROS5)
SQLNET.AUTHENTICATION_KERBEROS5_SERVICE=kservice
To set parameters in the initialization parameter file:
REMOTE_OS_AUTHENT=FALSE
OS_AUTHENT_PREFIX to null as follows:
OS_AUTHENT_PREFIX=""
Setting this parameter to null overrides the default value of OPS$.
In addition to the required parameters, you can optionally set the following parameters in the sqlnet.ora file on the client and the Oracle database server:
To create Oracle users that Kerberos can authenticate, perform this task on the Kerberos authentication server where the administration tools are installed. The realm must already exist.
|
Note: The utility names in this section are executable programs. However, the Kerberos user name |
Run /krb5/admin/kadmin.local as root to create a new Kerberos user, such as krbuser.
The following example is UNIX-specific:
# ./kadmin.localkadmin.local: addprinc krbuserEnter password for principal: "krbuser@SOMECO.COM":(password does not display)Re-enter password for principal: "krbuser@SOMECO.COM":(password does not display)kadmin.local: exit
Run SQL*Plus on the Oracle database server to create the Oracle user that corresponds to the Kerberos user. In the following example, OS_AUTHENT_PREFIX is set to null (""). The Oracle user name is in uppercase enclosed in double quotation marks as shown in the following example:
SQL> CONNECT / AS SYSDBA;SQL> CREATE USER "KRBUSER@SOMECO.COM" IDENTIFIED EXTERNALLY;SQL> GRANT CREATE SESSION TO "KRBUSER@SOMECO.COM";
Before you can connect to the database, you must ask the Key Distribution Center (KDC) for an initial ticket. To do so, run the following on the client:
% okinitusername
If, when making a database connection, a reference such as the following follows a database link, you must use the forwardable flag (-f) option:
sqlplus /@oracle
Executing okinit -f enables credentials that can be used across database links. Run the following commands on the Oracle client:
% okinit -fPassword for krbuser@SOMECO.COM:password
Three utilities are shipped with the Oracle Kerberos authentication adapter. These utilities are intended for use on an Oracle client with Oracle Kerberos authentication support installed. Use the following utilities in for these specified tasks:
The okinit utility obtains and caches Kerberos tickets. This utility is typically used to obtain the ticket-granting ticket, using a password entered by the user to decrypt the credential from the key distribution center (KDC). The ticket-granting ticket is then stored in the user's credential cache.
The options available with okinit are listed in Table 6-1:
Table 6-1 Options for the okinit UtilityRun the oklist utility to display the list of tickets held; available oklist options are listed in Table 6-2:
Table 6-2 Options for the oklist UtilityThe show flag option (-f) displays additional information, as shown in the following example:
% oklist -f27-Jul-1999 21:57:51 28-Jul-1999 05:58:14krbtgt/SOMECO.COM@SOMECO.COMFlags: FI
Use the okdstry utility to remove credentials from the credentials cache file:
$ okdstry -f
where the -f command option lets you specify an alternative credential cache. For UNIX, the default is /tmp/krb5cc_uid. You can also specify the alternate credential cache by using the SQLNET.KRB5_CC_NAME parameter in the sqlnet.ora file.
You can now connect to an Oracle database server without using a user name or password. Enter a command similar to the following:
$ sqlplus /@net_service_name
where net_service_name is an Oracle Net Services service name. For example:
$ sqlplus /@oracle_dbname
| See Also:
Chapter 1, Introduction to Oracle Advanced Security, for information about external authentication and Oracle9i Heterogeneous Connectivity Administrator's Guide |
Oracle Advanced Security, which complies with MIT Kerberos, can interoperate with tickets that are issued by a Kerberos Key Distribution Center (KDC) on a Windows 2000 domain controller to enable Kerberos authentication with an Oracle database. To configure Kerberos authentication that uses a Windows 2000 domain controller KDC, perform the following tasks:
The following steps must be performed on the Oracle Kerberos client.
Create the following Kerberos client configuration files that refer to the Windows 2000 domain controller as the Kerberos KDC. In the examples that follow, the Windows 2000 domain controller is running on a node named sales3854.us.acme.com.
krb.conf file
For example:
SALES3854.US.ACME.COM
SALES3854.US.ACME.COM sales3854.us.acme.com admin server
krb5.conf file
For example:
[libdefaults]
default_realm=SALES.US.ACME.COM
[realms]
SALES.US.ACME.COM= {
kdc=sales3854.us.acme.com:88
}
[domain_realm]
.us.acme.com=SALES3854.US.ACME.COM
krb5.realms file
For example:
us.acme.com SALES.US.ACME.COM
Configuring an Oracle client to interoperate with a Windows 2000 domain controller KDC uses the same sqlnet.ora file parameters that are listed in "Step 1: Configure Kerberos on the Client and on the Database Server".
Set the following parameters in the sqlnet.ora file on the client:
SQLNET.KERBEROS5_CONF=pathname_to_Kerberos_configuration_fileSQLNET.KERBEROS5_CONF_MIT=TRUE SQLNET.AUTHENTICATION_KERBEROS5_SERVICE=Kerberos_service_nameSQLNET.AUTHENTICATION_SERVICES=(BEQ,KERBEROS5)
The Windows 2000 domain controller KDC listens on UDP/TCP port 88. Ensure that the system file entry for kerberos5 is set to UDP/TCP port 88 as follows:
The following steps must be performed on the Windows 2000 domain controller.
Create a new user for the Oracle client in Microsoft Active Directory.
For example, if the Oracle database runs on the host sales3854.us.acme.com, then use Active Directory to create a user with the username sales3854.us.acme.com and the password oracle.
Ktpass command line utility to extract the keytab file with the following syntax:
Ktpass -princservice/hostname@NT-DNS-REALM-NAME-mapuseraccount-passpassword-outkeytab.file
Using the database user created in the previous step, the following is an example of Ktpass usage:
C:> Ktpass -princoracle/sales3854.us.acme.com@SALES.US.COM-mapusersales3854-passoracle-outC:\temp\v5srvtab
This utility is part of the Windows 2000 Support Tools and can be found on the Windows 2000 distribution media in the \support\reskit\netmgmt\security folder.
For example, the keytab that was created in the previous step can be copied to /krb5/v5svrtab.
| See Also:
Detailed information about Windows 2000 interoperability with Kerberos 5 that is available at the following URL: http://www.microsoft.com/WINDOWS2000/techinfo/planning/security/ kerbsteps.asp |
The following steps must be performed on the host computer where the Oracle database is installed.
Specify values for the following parameters in the sqlnet.ora file for the database server:
SQLNET.KERBEROS5_CONF=pathname_to_Kerberos_configuration_fileSQLNET.KERBEROS5_KEYTAB=pathname_to_Kerberos_principal/key_tableSQLNET.KERBEROS5_CONF_MIT=TRUE SQLNET.AUTHENTICATION_KERBEROS5_SERVICE=Kerberos_service_nameSQLNET.AUTHENTICATION_SERVICES=(BEQ,KERBEROS5)
Follow the task information for "Task 9: Create an Externally Authenticated Oracle User" to create an externally authenticated Oracle user. Ensure that the username is created in all uppercase characters. For example, ORAKRB@SALES.US.ACME.COM.
See Also:
|
Before a client can connect to the database, the client must request an initial ticket. To request an initial ticket, follow the task information for "Task 10: Get an Initial Ticket for the Kerberos/Oracle User".
This section lists some common configuration problems and explains how to resolve them.
sqlnet.ora file on the database server side has a service name that corresponds to a service known by Kerberos.SQLNET.KERBEROS5_CLOCKSKEW parameter in thesqlnet.ora file).sqlnet.ora parameters).sqlnet.ora file on the database server side.
|
 Copyright © 1996, 2002 Oracle Corporation. All Rights Reserved. |
|