| Oracle® Database 2 Day + PHP Developer's Guide 11g Release 1 (11.1) Part Number B28845-01 |
|
|
View PDF |
| Oracle® Database 2 Day + PHP Developer's Guide 11g Release 1 (11.1) Part Number B28845-01 |
|
|
View PDF |
In this chapter, you extend the Anyco HR application from Chapter 3 by adding information to the Departments page. You also implement the functionality to query, insert, update, and delete employee records in a specific department.
This chapter has the following topics:
In this section, you will modify your application code by moving the database access logic into separate files for inclusion in the PHP application.
Copy the files that you completed in Chapter 3 to a new chap4 directory, and change to the newly created directory:
On Windows:
mkdir c:\program files\Zend\Apache2\htdocs\chap4
cd c:\program files\Zend\Apache2\htdocs\chap4
copy ..\chap3\* .
On Linux:
mkdir $HOME/public_html/chap4
cd $HOME/public_html/chap4
cp ../chap3/* .
Using your preferred editor, create a file called anyco_cn.inc that defines named constants for the database connection information. This file enables you to change connection information in one place.
<?php // File: anyco_cn.inc

define('ORA_CON_UN', 'hr');             // User name
define('ORA_CON_PW', 'hr');             // Password
define('ORA_CON_DB', '//localhost/orcl'); // Connection identifier

?>
For simplicity, the user name and password are written into this sample application code. For applications that will be deployed, coding the user name and password strings directly into your application source code is not recommended. Oracle recommends that you use a more secure technique, such as implementing a dialog that prompts the user for the user name and password.
See Oracle Database Security Guide and the documentation for your development environment for details on security features and practices.
Create a file called anyco_db.inc that declares functions for creating a database connection, executing a query, and disconnecting from the database. Use the following logic, which includes some error handling that is managed by calling an additional function called db_error ():
<?php  // File: anyco_db.inc

function db_connect()
{
  // use constants defined in anyco_cn.inc
  $conn = oci_connect(ORA_CON_UN, ORA_CON_PW, ORA_CON_DB);
  if (!$conn) {
    db_error(null, __FILE__, __LINE__);
  }
  return($conn);
}

function db_do_query($conn, $statement)
{
  $stid = oci_parse($conn, $statement);
  if (!$stid) {
    db_error($conn, __FILE__, __LINE__);
  }

  $r = oci_execute($stid, OCI_DEFAULT);
  if (!$r) {
    db_error($stid, __FILE__, __LINE__);
  }
 $r = oci_fetch_all($stid, $results, null, null,
                     OCI_FETCHSTATEMENT_BY_ROW);
  return($results);
}

// $r is the resource containing the error.
// Pass no argument or false for connection errors

function db_error($r = false, $file, $line)
{
  $err =  $r ? oci_error($r) : oci_error();

  if (isset($err['message'])) {
    $m = htmlentities($err['message']);
  }
  else {
    $m = 'Unknown DB error';
  }

  echo '<p><b>Error</b>: at line '.$line.' of '.$file.'</p>';
  echo '<pre>'.$m.'</pre>';

  exit;
}

?>
The db_do_query() function in this example uses the oci_fetch_all() OCI8 function. The oci_fetch_all() function accepts the following five parameters:
$results, the output array variable containing the data returned for the query
The null in the third parameter for the number of initial rows to skip is ignored.
The null in the fourth parameter for the maximum number of rows to fetch is ignored. In this case, all the rows for the query are returned. For this example where the result set is not large, it is acceptable.
The last parameter flag OCI_FETCHSTATEMENT_BY_ROW indicates that the data in the $results array is organized by row, where each row contains an array of column values. A value of OCI_FETCHSTATEMENT_BY_COLUMN causes the results array to be organized by column, where each column entry contains an array of column values for each row. Your choice of value for this flag depends on how you intend to process the data in your logic.
To examine the structure of the result array, use the PHP var_dump() function after the query has been executed. This is useful for debugging. For example:
print '<pre>';
var_dump($results);
print '</pre>';
The db_error() function accepts three arguments. The $r parameter can be false or null for obtaining connection errors, or a connection resource or statement resource to obtain an error for those contexts. The $file and $line values are populated by using __FILE__ and __LINE__, respectively, as the actual parameters to enable the error message to display the source file and line from which the database error is reported. This enables you to easily track the possible cause of errors.
The db_ error() function calls the oci_error() function to obtain database error messages.
The db_error() function calls the isset() function before printing the message. The isset() function checks if the message component of the database error structure is set, or if the error is unknown.
Edit anyco_ui.inc. To format the results of a single row from the DEPARTMENTS table query in an HTML table format, insert the following function:
function ui_print_department($dept)
{
  if (!$dept) {
    echo '<p>No Department found</p>';
  }
  else {
    echo <<<END
  <table>
  <tr>
    <th>Department<br>ID</th>
    <th>Department<br>Name</th>
    <th>Manager<br>Id</th>
    <th>Location ID</th>
  </tr>
  <tr>
END;
    echo '<td>'.htmlentities($dept['DEPARTMENT_ID']).'</td>';
    echo '<td>'.htmlentities($dept['DEPARTMENT_NAME']).'</td>';
    echo '<td>'.htmlentities($dept['MANAGER_ID']).'</td>';
    echo '<td>'.htmlentities($dept['LOCATION_ID']).'</td>';
    echo <<<END
  </tr>
  </table>
END;
  }
}
As noted in Chapter 3, do not prefix END; lines with leading spaces. If you do, the rest of the document will be treated as part of the text to be printed.
Edit the anyco.php file. Include the anyco_ui.inc and anyco_db.inc files, and call the database functions to query and display information for a department with a department_id of 80 by using the following code. The file becomes:
<?php // File: anyco.php

require('anyco_cn.inc');
require('anyco_db.inc');
require('anyco_ui.inc');

$query =
  'SELECT   department_id, department_name, manager_id, location_id
   FROM     departments
   WHERE    department_id = 80';

$conn = db_connect();

$dept = db_do_query($conn, $query);
ui_print_header('Departments');
ui_print_department($dept[0]);
ui_print_footer(date('Y-m-d H:i:s'));

?>
To test the resulting changes to the application, enter the following URL in a browser window:
On Windows:
http://localhost/chap4/anyco.php
On Linux:
http://localhost/~<username>/chap4/anyco.php
The page returned in the browser window should resemble the following page:

Using queries with values included in the WHERE clause may be useful for some situations. However, if the conditional values in the query are likely to change it is not appropriate to encode a value into the query. Oracle recommends that you use bind variables.
A bind variable is a symbolic name preceded by a colon in the query that acts as a placeholder for literal values. For example, the query string created in the anyco.php file could be rewritten with the bind variable :did as follows:
$query =
  'SELECT   department_id, department_name, manager_id, location_id
   FROM     departments
   WHERE    department_id = :did';
By using bind variables to parameterize SQL statements:
The statement is reusable with different input values without needing to change the code.
The query performance is improved through a reduction of the query parse time in the server, because the Oracle database can reuse parse information from the previous invocations of the identical query string.
There is protection against "SQL Injection" security problems.
There is no need to specially handle quotation marks in user input.
When a query uses a bind variable, the PHP code must associate an actual value with each bind variable (placeholder) used in the query before it is executed. This process is known as run-time binding.
To enable your PHP application to use bind variables in the query, perform the following changes to your PHP application code:
Edit the anyco.php file. Modify the query to use a bind variable, create an array to store the value to be associated with the bind variable, and pass the $bindargs array to the db_do_query() function:
<?php // File: anyco.php
...

$query =
'SELECT   department_id, department_name, manager_id, location_id
 FROM     departments
 WHERE    department_id = :did';

$bindargs = array();
// In the $bindargs array add an array containing
// the bind variable name used in the query, its value, a length
array_push($bindargs, array('DID', 80, -1));

$conn = db_connect();
$dept = db_do_query($conn, $query, $bindargs);

...
?>
In this example, the bind variable, called DID, is an input argument in the parameterized query, and it is associated with the value 80. Later, the value of the bind variable will be dynamically determined. In addition, the length component is passed as -1 so that the OCI8 layer can determine the length. If the bind variable was used to return output from the database an explicit size would be required.
Edit the anyco_db.inc file. Modify the db_do_query() function to accept a $bindvars array variable as a third parameter. Call the oci_bind_by_name() OCI8 call to associate the PHP values supplied in $bindvars parameter with bind variables in the query. The function becomes:
function db_do_query($conn, $statement, $bindvars = array())
{
  $stid = oci_parse($conn, $statement);
  if (!$stid) {
    db_error($conn, __FILE__, __LINE__);
  }

  // Bind the PHP values to query bind parameters
  foreach ($bindvars as $b) {
    // create local variable with caller specified bind value
    $$b[0] = $b[1];
    // oci_bind_by_name(resource, bv_name, php_variable, length)
    $r = oci_bind_by_name($stid, ":$b[0]", $$b[0], $b[2]);
    if (!$r) {
      db_error($stid, __FILE__, __LINE__);
    }
  }
  $r = oci_execute($stid, OCI_DEFAULT);
  if (!$r) {
        db_error($stid, __FILE__, __LINE__);
  }
  $r = oci_fetch_all($stid, $results, null, null,
                         OCI_FETCHSTATEMENT_BY_ROW);
  return($results);
}
The binding is performed in the foreach loop before the oci_execute() is done.
For each entry in $bindvars array, the first element contains the query bind variable name that is used to create a PHP variable of the same name; that is, $$b[0] takes the value DID in $b[0] and forms a PHP variable called $DID whose value is assigned from the second element in the entry.
The oci_bind_by_name() function accepts four parameters: the $stid as the resource, a string representing the bind variable name in the query derived from the first element in the array entry, the PHP variable containing the value to be associated with the bind variable, and the length of the input value.
To test the results of the preceding modifications, save the anyco.php and anyco_db.inc files and enter the following URL:
On Windows:
http://localhost/chap4/anyco.php
On Linux:
http://localhost/~<username>/chap4/anyco.php
The page returned in the browser window should resemble the following page:

Adding navigation through the database records requires several important changes to the application logic. The modifications require the combination of:
Including an HTML form to provide Next and Previous navigation buttons to step through database records.
Detecting if the HTTP request for the page was posted by clicking the Next or Previous button.
Tracking the last row queried by using the HTTP session state. A PHP session is started to maintain state information for a specific client between HTTP requests. The first HTTP request will retrieve the first data row and initialize the session state. A subsequent request, initiated with navigation buttons, combined with the session state from a previous HTTP request, enables the application to set variables that control the next record retrieved by the query.
Writing a query that returns a subset of rows based on a set of conditions whose values are determined by the application state.
To add navigation through database rows, perform the following steps:
Edit the anyco_ui.inc file. Add Next and Previous navigation buttons to the Departments page. Change the ui_print_department() function to append a second parameter called $posturl that supplies the value for the form attribute action. After printing the </table> tag include HTML form tags for the Next and Previous buttons:
<?php // File: anyco_ui.inc
...
function ui_print_department($dept, $posturl)
{
  ...
    echo <<<END
  </tr>
  </table>
  <form method="post" action="$posturl">
  <input type="submit" value="< Previous" name="prevdept">
  <input type="submit" value="Next >"     name="nextdept">
  </form>
END;
  }
}

?>
Edit the anyco.php file. To detect if the Next or Previous button was used to invoke the page and track the session state, call the PHP function session_start(), and create a function named construct_departments():
Move and modify the database access logic into a new construct_departments() function, which detects if navigation has been performed, manages the session state, defines a subquery for the database access layer to process, and connects and calls a function db_get_page_data(). The file becomes:
<?php // File: anyco.php

require('anyco_cn.inc');
require('anyco_db.inc');
require('anyco_ui.inc');

session_start();
construct_departments();

function construct_departments()
{
  if (isset($_SESSION['currentdept']) &&
      isset($_POST['prevdept']) &&
      $_SESSION['currentdept'] > 1) {
    $current = $_SESSION['currentdept'] - 1;
  }
  elseif (isset($_SESSION['currentdept']) &&
          isset($_POST['nextdept'])) {
    $current = $_SESSION['currentdept'] + 1;
  }
  elseif (isset($_POST['showdept']) &&
          isset($_SESSION['currentdept'])) {
    $current = $_SESSION['currentdept'];
  }
  else {
    $current = 1;
  }

  $query = 'SELECT department_id, department_name,
                   manager_id, location_id
            FROM   departments
            ORDER BY department_id asc';

  $conn = db_connect();

  $dept = db_get_page_data($conn, $query, $current, 1);
  $deptid = $dept[0]['DEPARTMENT_ID'];

  $_SESSION['currentdept'] = $current;

  ui_print_header('Department');
  ui_print_department($dept[0], $_SERVER['SCRIPT_NAME']);
  ui_print_footer(date('Y-m-d H:i:s'));
}

?>
The if and elseif construct at the start of the construct_departments() function is used to detect if a navigation button was used with an HTTP post request to process the page, and tracks if the currentdept number is set in the session state. Depending on the circumstances, the variable $current is decremented by one when the previous button is clicked, $current is incremented by one when the Next button is clicked, otherwise $current is set to the current department, or initialized to one for the first time through.
A query is formed to obtain all the department rows in ascending sequence of the department_id. The ORDER BY clause is an essential part of the navigation logic. The query is used as a subquery inside the db_get_page_data() function to obtain a page of a number of rows, where the number of rows per page is specified as the fourth argument to the db_get_page_data() function. After connecting to the database, db_get_page_data() is called to retrieve the set of rows obtained for the specified query. The db_get_page_data() function is provided with the connection resource, the query string, a value in $current specifying the first row in the next page of data rows required, and the number of rows per page (in this case one row per page).
After db_get_page_data()has been called to obtain a page of rows, the value of $current is stored in the application session state.
Between printing the page header and footer, the ui_print_department() function is called to display the recently fetched department row. The ui_print_department() function uses $_SERVER['SCRIPT_NAME'] to supply the current PHP script name for the $posturl parameter. This sets the action attribute in the HTML form, so that each Next or Previous button click calls the anyco.php file.
Edit the anyco_db.inc file. Implement the db_get_page_data() function to query a subset of rows:
// Return subset of records
function db_get_page_data($conn, $q1, $current = 1,
                 $rowsperpage = 1, $bindvars = array())
{
  // This query wraps the supplied query, and is used
  // to retrieve a subset of rows from $q1
  $query = 'SELECT *
            FROM (SELECT A.*, ROWNUM AS RNUM
                  FROM ('.$q1.') A
                  WHERE ROWNUM <= :LAST)
            WHERE :FIRST <= RNUM';

  // Set up bind variables.
  array_push($bindvars, array('FIRST', $current, -1));
  array_push($bindvars,
             array('LAST', $current+$rowsperpage-1, -1));

  $r = db_do_query($conn, $query, $bindvars);
  return($r);
}
The structure of the query in the db_get_page_data() function enables navigation through a set (or page) of database rows.
The query supplied in $q1 is nested as a subquery inside the following subquery:
SELECT A.*, ROWNUM AS RNUM FROM $q1 WHERE ROWNUM <= :LAST
Remember that the query supplied in $q1 retrieves an ordered set of rows, which is filtered by its enclosing query to return all the rows from the first row to the next page size ($rowsperpage) of rows. This is possible because the Oracle ROWNUM function (or pseudocolumn) returns an integer number starting at 1 for each row returned by the query in $q1.
The set of rows, returned by the subquery enclosing query $q1, is filtered a second time by the condition in the following outermost query:
WHERE :FIRST <= RNUM
This condition ensures that rows prior to the value in :FIRST (the value in $current) are excluded from the final set of rows. The query enables navigation through a set rows where the first row is determined by the $current value and the page size is determined by the $rowsperpage value.
The $current value is associated with the bind variable called :FIRST. The expression $current+$rowsperpage-1 sets the value associated with the :LAST bind variable.
To test the changes made to your application, save the changed files, and enter the following URL in your Web browser:
On Windows:
http://localhost/chap4/anyco.php
On Linux:
http://localhost/~<username>/chap4/anyco.php
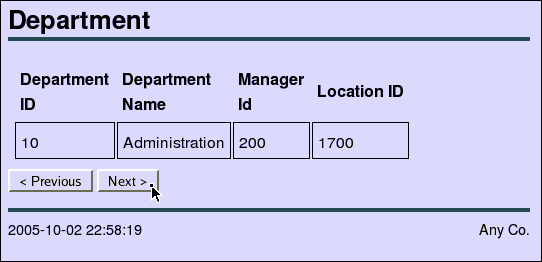
When you request the anyco.php page, the first DEPARTMENT table record, the Administration department, is displayed:

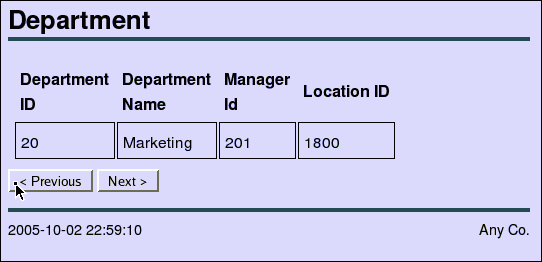
To navigate to the next department record (Marketing), click Next:

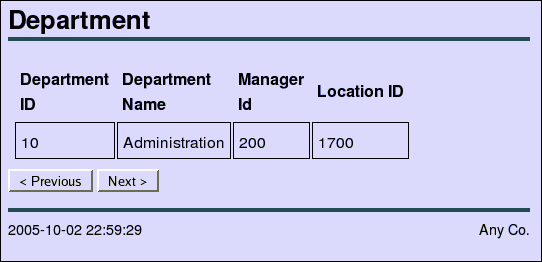
To navigate back to the first department record (Administration), click Previous:

You may continue to test and experiment with the application by clicking Next and Previous to navigate to other records in the DEPARTMENTS table, as desired.
Note:
If you navigate past the last record in theDEPARTMENTS table, an error will occur. Error handling is added in Adding Error Recovery in Chapter 5.If you were writing a PHP function with a hard coded query, the ROW_NUMBER() function may be a simpler alernative for limiting the number of rows returned. For example, a query that returns the last name of all employees:
SELECT last_name FROM employees ORDER BY last_name;
could be written to select rows 51 to 100 inclusive as:
SELECT last_name FROM
  SELECT last_name, ROW_NUMBER() OVER (ORDER BY last_name R FROM employees)
  where R BETWEEN 51 AND 100;
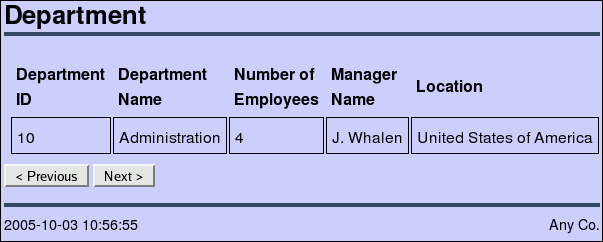
The Departments page is extended to include the following additional information:
The name of the manager of the department
The number of employees assigned to the department
The country name identifying the location of the department
The additional information is obtained by modifying the query to perform a join operation between the DEPARTMENTS, EMPLOYEES, LOCATIONS, and COUNTRIES tables.
To extend the Departments page, perform the following tasks:
Edit the anyco_ui.inc file. Modify the ui_print_department() function by replacing the Manager ID and Location ID references with the Manager Name and Location, respectively, and insert a Number of Employees field after Department Name. Make the necessary changes in the table header and data fields. The function becomes:
function ui_print_department($dept, $posturl)
{
  if (!$dept) {
    echo '<p>No Department found</p>';
  }
  else {
    echo <<<END
  <table>
  <tr>
    <th>Department<br>ID</th>
    <th>Department<br>Name</th>
    <th>Number of<br>Employees</th>
    <th>Manager<br>Name</th>
    <th>Location</th>
  </tr>
  <tr>
END;
  echo '<td>'.htmlentities($dept['DEPARTMENT_ID']).'</td>';
  echo '<td>'.htmlentities($dept['DEPARTMENT_NAME']).'</td>';
  echo '<td>'.htmlentities($dept['NUMBER_OF_EMPLOYEES']).'</td>';
  echo '<td>'.htmlentities($dept['MANAGER_NAME']).'</td>';
  echo '<td>'.htmlentities($dept['COUNTRY_NAME']).'</td>';
  echo <<<END
  </tr>
  </table>
  <form method="post" action="$posturl">
  <input type="submit" value="< Previous" name="prevdept">
  <input type="submit" value="Next >"     name="nextdept">
  </form>
END;
  }
}
Edit the anyco.php file. Replace the query string in construct_departments() with:
$query =
  "SELECT d.department_id, d.department_name,
       substr(e.first_name,1,1)||'. '|| e.last_name as manager_name,
       c.country_name, count(e2.employee_id) as number_of_employees
   FROM  departments d, employees e, locations l,
         countries c, employees e2
   WHERE d.manager_id = e.employee_id
   AND d.location_id = l.location_id
   AND d.department_id = e2.department_id
   AND l.country_id = c.country_id
   GROUP BY d.department_id, d.department_name,
         substr(e.first_name,1,1)||'. '||e.last_name,
         c.country_name
   ORDER BY d.department_id ASC";
The query string is enclosed in double quotation marks to simplify writing this statement, which contains SQL literal strings in single quotation marks.
Save the changes to your files, and test the changes by entering the following URL in a Web browser:
On Windows:
http://localhost/chap4/anyco.php
On Linux:
http://localhost/~<username>/chap4/anyco.php
The Web page result should resemble the following output:
