| Uploading Files Using CGI and
Perl
Matt
Doyle |
|
Would you like to give your visitors the ability to upload files to your site? Letting them upload content with their Web browsers can be very useful, and fun too! You can let them contribute pictures, sounds and other binary files to your site. And you can use a file upload facility on your own Website to update your site's content easily via your own Web browser. If you've ever used a Web-based email service such as Yahoo! Mail or Hotmail, you've probably sent email with attachments. To add attachments to your emails, you simply click the "Browse..." button on the Web page to select the file from your hard drive, and then your browser sends the file to the server. This is file upload in action! But how does it work? In this article I'm going to talk you through the process of file upload, and show you how to build a simple file upload example using CGI and Perl. The example we'll go through will allow people to upload photos of themselves to your Web server.
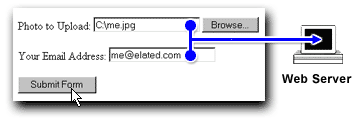
File upload works by using a special type of form field called "file", and a special type of form encoding called "multipart/form-data". The file form field displays a text box for the filename of the file to upload, and a "Browse..." button:
The user clicks the "Browse..." button to bring up the file selector, and chooses the file they wish to upload. Then, when they click the "Submit" button on the form, the file's data is uploaded to the Web server, along with the rest of the form's data:
 At the Web server end, the software (in our case, a CGI script) interprets the form data that's sent from the browser, and extracts the file name and contents, along with the other form fields. Usually, the file is then saved to a directory on the server. Now, let's create a file upload form that allows your users to upload files to your Web server.
1. The FORM Tag The first line of code for a file upload form is the
Note the special multipart/form-data encoding type, which is what we
use for file upload. Note also that the form will post the data to our
upload script, called 2. The INPUT TYPE=FILE Tag The second part of the file upload form is the upload field itself. In this example we're creating a form so that our users can upload their photos, so we need an upload field called "photo":
3. Other INPUT Tags You can include other, normal form fields in your form as well as the
4. The Submit Button As with a regular form, we need a "Submit" button so that the user can send the form to the Web server:
The Finished Form So our complete file upload form looks like this:
Save this file somewhere on your hard drive, and call it something like
So far so good! Now let's look at how to write the server CGI script,
|
|
Creating the File Upload Script Handling the data that the browser sends when it uploads a file is quite a complex process. Fortunately, the Perl CGI library, CGI.pm, does most of the dirty work for us! Using two methods of the CGI query object, 1. First Things First The first things we need to do in our script are, of course, create the shebang line, and use the Perl CGI library: use CGI; Note the use of the -w to make Perl warn us of any potential dangers in our code. It's nearly always a good idea to put the -w in! 2. The Upload Directory We need a location on our server where we can store the uploaded files. We want these files (photos) to be visible on our Website, so we should store them in a directory under our document root, for example:
So you'll need to create a directory called "upload" on your Website's
document root, then set 3. Reading the Form Variables The next step is to read in the filename of our uploaded file, and the email address that the user entered into the form: $filename = $query->param("photo"); Some browsers pass the whole path to the file, instead of just the filename, so it's a good idea to strip off everything that includes backslashes (Windows browsers) and forward slashes (Unix browsers) and which might appear before the filename:
4. Getting the File Handle As I mentioned above, we can use the
5. Saving the File Now that we have a handle to our uploaded file, we can read its contents and save it out to a new file in our file upload area. We'll use the uploaded file's filename as the name of our new file: while ( <$upload_filehandle> ) close UPLOADFILE; 6. Thank the User We've now uploaded our file! The last step is to display a quick thank-you note to the user, and to show them their uploaded photo and email address: <HTML> <BODY> <P>Thanks for uploading your photo!</P> </BODY> END_HTML The Finished Script Your finished CGI script should look something like this: use CGI; $upload_dir = "/home/mywebsite/htdocs/upload"; $query = new CGI; $filename = $query->param("photo"); open UPLOADFILE, ">$upload_dir/$filename"; while ( <$upload_filehandle> ) close UPLOADFILE; print $query->header ( ); <HTML> <BODY> <P>Thanks for uploading your photo!</P> </BODY> END_HTML Save this file on your hard drive, and call it "upload.cgi". Now we've created our server-side script, we can place both the script and the form on our server and test the file upload. |
|
Putting It All Together 1. Place the Files on your Server Place the HTML form somewhere under your Website's document root, and your CGI script in your Website's cgi-bin directory. Note: don't forget to make the CGI script executable if you're on a
UNIX server - 2. Set the Correct Paths and URLs If necessary, change the "upload.cgi" URL in the
Also, don't forget to set the correct path to Perl in your CGI script, and the correct absolute path to the 'upload' directory that you created on your server:
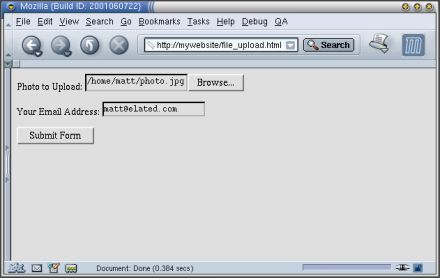
3. Test the Script Let's try it out! Go to the URL of your file upload form on your server, select a photo to upload, and enter your email address:
 Press the "Submit Form" button. If all goes well, the photo will be uploaded to the server, and you should see the "Thanks!" page, which also displays your photo and email address:
 Congratulations - you've written a file upload handler script! If you get Internal Server Errors, double-check the permissions, paths and URLs described above, and look for other common CGI script pitfalls. For instance, editing a file on Windows and then uploading it to your Web server in Binary format will cause the script to crash on Unix servers.
A couple of points about this script are worth a mention: If you were doing this on a real Website with lots of users, it would be a good idea to create a separate upload directory for each user, so that one user's photo won't be overwritten with another user's photo of the same name! File upload isn't perfect. All browsers handle file uploads slightly differently, and some browsers can have trouble uploading files to certain types of servers and scripts. On the whole, though, most users won't have any problem with the most popular browsers. That's it. Have fun with your file uploads! |
| URL: http://www.webmasterbase.com/article.php?aid=474&pid=0 |